Wednesday, November 30, 2011

A Meaningful Celebration

We have these friends. They are the kind of good people that you are proud to call your close friends. They have been friends of my husband's since freshman year at Penn State and quickly became MY friends too over seven years ago. We just love them. You can imagine how excited we were for them when we received a call in the summer of 2010 saying that they were expecting twin girls the following spring. Good things happen to good people!

Well, the babies came a little too early last November…16 weeks too early to be exact. Claire and Mary entered the world at their own will...tough cookies just like their mom! Mary fought the good fight for two strenuous weeks before leaving us all to go to a better place and serve as an angel watching over her sister. After an uphill battle and 103 days in a wonderful NICU Claire, at one point weighing only 15 ounces, celebrated her first birthday two weeks ago. She has amazed us all with her inspirational spirit from day one. As I am sure you have gathered, Claire is a miracle in many ways…a miracle who can melt your heart with one quick smile. She has brought joy to so many, undoubtedly none more so than to her parents who have served as role-models over the past year in the department of rising to the occasion.


“One day at a time” was and continues to be their mantra, even partnering with the March of Dimes to have bracelets printed with the sentiment to be given to other parents braving the uncertainty of a premature child. November is Prematurity Awareness Month® and when the March of Dimes focuses the nation’s attention on premature birth. You can learn more about their efforts here.

Or you can just rejoice in the fact that Claire happily celebrated her first birthday party with her biggest cheerleaders last weekend…complete with preppy birthday cookies. :)


And the only gift her mom said she wanted from me...a party hat.


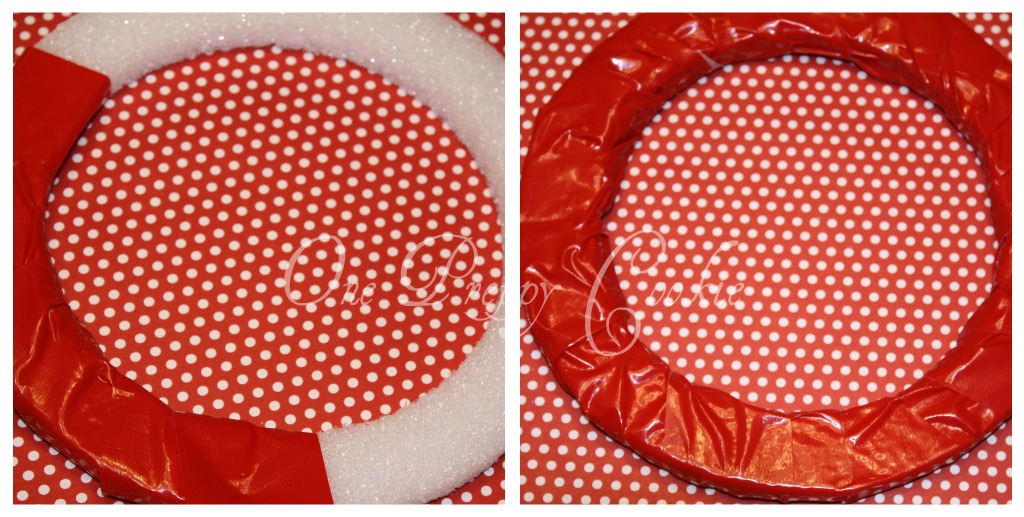
Of course I was more than happy to oblige. (Tutorial coming soon!)


Thank you for allowing me to tell your story and share your photos Mart. You are such a hero in my eyes...even if you don't own a hot glue gun. ;)

Tuesday, November 29, 2011

TUTORIAL: How to Make a Peppermint Wreath

Last year a friend of mine was working on the cutest candy corn wreath for Halloween. I loved it but never got around to making one myself. We talked about that very wreath just the other day and it inspired me to think of a Christmas version. Hence I got to work on a very simple project - a peppermint wreath. I intend to wire this into the center of my green wreath for a punch of color and whimsy. (Although I haven't made it that far yet so for now I will just show you the peppermint part for now!)

To make a peppermint wreath you will need:

-Styrofoam wreath form
-Red duct tape
-1 large bag of unwrapped peppermints (I sprayed mine with Krylon Preserve It first)
-Hot glue gun & plenty of glue sticks
-Ribbon

(Please ignore the pipe cleaners in this photo. I ended up not using them.)


This wreath is as easy as 1-2-3.

1.) Wrap the styrofoam with duct tape.


2.) Dab a bit of hot glue onto the back of each peppermint and attach it to the wreath. Start in the center, then work on the main part of the wreath and wrap up with the outer layer. (Remember to spray the peppermints with a protective spray if you plan to reuse your wreath. Follow the directions as listed prior to using.)


3.) Attach a ribbon of your choice for the wreath to hang from. (Or wire it into the center of a green wreath as I eventually intend to.)


And there you have it - a simple, festive project done in a snap.

Merry Merry!

Monday, November 28, 2011

Decking the *Sparkly* Halls

As I was scrolling through Pinterest the other day I came across this pin promising three times the "sparkle" on your Christmas tree with just a few simple steps. Intrigued, I decided to give it a try over the weekend while setting up our tree.

I went to my craft store and bought the supplies. (Mirror squares, ornament hangers and my trusty hot glue gun.)


I simply glued an ornament hanger to the back of one square and then attached the back of the other square to the excess hot glue (you will then have mirrors on both sides.)


I placed about one dozen of these ornaments inside of the tree near lights prior to putting on my ornaments. In the end, I am not sure that it made a huge difference (anyone have any pointers to make it more effective??) I do like a LOT of lights on our tree as it is, so we have plenty of sparkle with or without assistance...


Every little bit helps I suppose. 'Tis the season!

Thursday, November 24, 2011

Happy Thanksgiving!

Happiest of Thanksgivings to you and yours!


I grew up having big family Thanksgiving dinners (well as big as Thanksgiving dinners can get when you have a pretty small family.) We had all of the traditional fare and while we have a smaller group these days, we continue to serve enough food for an army. I am thankful to have a loving family to share the day with year after year.

While I made pies for my own family this year, I had the opportunity to make some Thanksgiving cookies for a friend. These cookies are making the pilgrimage to North Carolina and ITALY. (Three cheers for OPC going abroad!)


Many thanks to you Cori and a wonderful holiday to all. Enjoy!

Wednesday, November 23, 2011

TUTORIAL: How to Make a Mason Jar Snow Globe

Last week I went shopping with a friend at a store that is often referred to as "Anthro" for short. You know, the one whose name when spelled with a "y" at the end instead of an "ie" means the study of humanity. Well, if you are with me then you know that this particular store has some fun gifts and stocking stuffers...though sometimes a bit on the pricey side.

While we were there, I picked up this snow globe made out of a small mason jar.


I turned it over to see that it cost $25! What?!?! I knew right away that I could make it for under $5 and document how to do so here. So consider this the craft version of "The Look for Less!" :)

This is the perfect quick activity to do with children (adults man the glue gun of course.) I could also see it working as a fun centerpiece for a winter dinner party or even serve as place cards or menu cards if you placed those items inside of the jar. The mason jars and inside contents may be adapted to any size of your liking.

To make a mason jar snow globe you will need:

-Mason jars in the size of your choice - I used 8 oz.
-Artificial snow
-Mini decorative trees - found in any craft store. (Mine had snow on them already but if yours don't you could use spray glue and glitter for the same look.)
-Hot glue


First unscrew the lid from the jar. Take your hot glue and place a dab on the bottom of a tree.


Place the glue onto the inside of the lid.


Repeat with as many trees as you would like. (I also saw miniature Santas, sleighs, presents, etc. while shopping for my supplies that would all look cute in these.)


Add as much artificial snow as you would like into the mason jar.


Then simply put the lid (tree side down) into the jar and screw on the cap.


That's it!


Here is the cost breakdown.

-Snow: $0.21/jar ($2.09 with 40% coupon - bag will make about 10 snow globes.)
-Mason jar:$1.20 each
-Trees: $0.66/jar ($1.99 for 12 piece bag)

Total cost for 8 oz mason jar snow globe: Under $2.15 each (& that's adding in a little for the glue!)

Tuesday, November 22, 2011

Little Pumpkin Baby Shower

I think I am among the last people to leave my pumpkins out and fall decor up until Thanksgiving passes. Believe me, come Friday I will be whisking it back into the closet and heading out to buy our Christmas tree (which will have about one needle left on it before I feel obligated to take it down) but for the next couple of days I am enjoying a harvest motif, with Christmas carols blaring in the background of course! And while I am only a few days away from baking Christmas cookies, I am going to try and showcase a fall/Thanksgiving theme while I still can.

My dad's nickname for me to this day is "punkin." That must be why I thought it was such a cute idea to have a "little pumpkin" themed baby shower. When I was sent this invitation to channel cookies from, I knew right away I would do my best to replicate the pumpkin baby.


And in the end, I thought they came out cute...


Thank you very much once again Bridget - I hope the shower went great!

Thursday, November 17, 2011

Breaking Dawn Part One - The Wait is OVER!

Whenever I think of the Twilight book series, I think of a vacation I was on three years ago this month. A group of our friends spent a little over a week in Key West with the grand finale being our friends' wedding. It was an amazing trip, but had a few chilly days. Determined not to let the chill deprive us of our beach time, we bundled up and sat in the sun anyway. My friend L and I were right in the middle of the Twilight series during that time, not minding the cold weather one bit as we were absolutely engrossed in the tales of Edward and Bella...


I am 100% a books over movie girl, but have high hopes for Breaking Dawn. While I will not have the opportunity to see it until next week, I have had the opportunity to make cookies to get in the spirit.

These cookies will be going to a celebratory premiere party tonight at my "Twi-hard" friend's house. I represented all four books in the cookies and have to say had a great time making them!


So, HERE is the question...


Team Edward or Team Jacob???

Thank you MaryJo!

Wednesday, November 16, 2011

TUTORIAL: How to Make a Flower Pin

About a month ago I received this invitation in the mail:


My friend, the hostess, is SERIOUS about her Twilight love. So serious in fact that she flew to California for the past two premieres. So when the invitation encourages you to wear your Twilight gear, you know she means business.

Another friend helped me brainstorm some intense costume ideas, but let's face it...I am just not that hard core. So I am going the black clothing route but wanted to show a little more spirit.

I wandered my fabric store for quite some time Monday night until an artificial poinsettia bloom caught my eye in the Christmas aisle. I spotted it and knew I could attempt to reconstruct it into the "New Moon" flower. And for $1.50 the price was right. You could do this project with any artificial flower you'd like to pull apart or even with fabric like I did for my pirate flower.


To make a flower pin you will need:

-Artificial flower OR 1/4 yard fabric of your choice
-Pin
-Small piece of felt
-Hot glue gun
-Scissors
-An embellishment of your choice for the center

First cut the petals off of the flower and shape them if needed (I needed to trim the point off each petal.)


The cut a small circle out of a piece of felt (no need for perfection here!)


Hot glue the felt to the front of your pin.


Then begin to glue the petals onto the felt, arranging them as you'd like.


Keep layering...


Until you have the size pin that you're going for.


The last step is to hot glue your embellishment into the center. I did not actually glue this pearl on yet as I am still searching for a chess piece to represent "Breaking Dawn" but I wanted to show you where it would go.


Voila!

So next time you want to show some spirit but not too much, consider making a quick accessory. You could customize this for any occasion!

Tuesday, November 15, 2011

They Say It's Your Birthday!

Who doesn't love to celebrate a birthday? I always enjoy celebrating my family and friends. Growing up, we were able to choose what we'd like to eat for dinner on our birthdays, dined off of the "You Are Special" red plate, received a special cake and had years worth of fun parties. Minus the parties many of these traditions continue today. Being a winter baby, I was always jealous of my brother's summer parties and that jealousy only continued when my surprise thirtieth birthday party was cancelled due to a fluke blizzard in the D.C. area. (By the way, I stopped turning one year older annually at 30!) Jealousy aside, birthdays are a great opportunity to celebrate the ones you love.

I have been making a LOT of birthday cookies and have a few to share today.

30th birthday cookies for a fun cosmopolitan-loving birthday girl...


Cookies for a preppy, cupcake, ice cream-loving new mom...


And cookies enjoyed during a girls' weekend to celebrate both a birthday and a baby...


Thank you Cindy, Jean and Amanda for including One Preppy Cookie in your celebrations!

Monday, November 14, 2011

Teenage Dream

Wow, another week another unexpected absence from blogging. After a very happy family event last weekend I was home less than 24 hours before I learned of a very sad event on my side of the family. I lost my beloved aunt to an awful disease called cancer. We celebrated her life in the company of family last week which is exactly what we all needed.

My aunt's granddaughter (and my cousin) wrote the most beautiful letter to my her expressing everything their relationship meant to her. It meant a lot to all of us. So in the spirit of family, I am going to share the cookies I made for my cousin's birthday last month.

It's hard to believe she is no longer the eight year old flower girl from our wedding but instead a lacrosse, fashion & soccer loving TEENAGER. I tried to respect her maturity and not make the doll cookies I wanted to make for her. ;)


Happy Birthday once again Miss Mads! And thanks to R&A for asking me to do this. xoxo

Tuesday, November 8, 2011

And They Lived Happily Ever After...

This past weekend we packed up and headed to our cousin (and more importantly close friends') wedding. My husband grew up with the groom and had the honor of returning the favor of serving as the best man in his wedding to his lovely bride.

While I was not the one giving the speech, I WAS the one bringing the cookie favors.


If you have not attended a wedding in western PA before, you may not know about "the cookie table." This was certainly not something I was familiar with until I married into a Pittsburgh-based family. It is a BIG deal and requires planning for one dozen cookies per guest. The bride and groom's friends and family filled the table with sweets (and not one was left behind!)


The groom's sister, a rising baking star in my opinion, took her cookies to the next level with lime basil and chai creations...


I stuck with my own sugar cookie recipe and made the favors for each guest. I could kick myself for not photographing these before a hasty panic at the end of the night, but you will get the idea. I made 5 different wedding cookie favors, channeling the bride's dress, the wedding cake and three varieties of monogram/love cookies.


The most important part of the day, however, was of course gaining a good friend as a family member and seeing a current family member happier than I have ever seen him.


Congratulations to the newlyweds!