Saturday, October 26, 2013

TUTORIAL: Halloween Witch Legs & Photo Booth

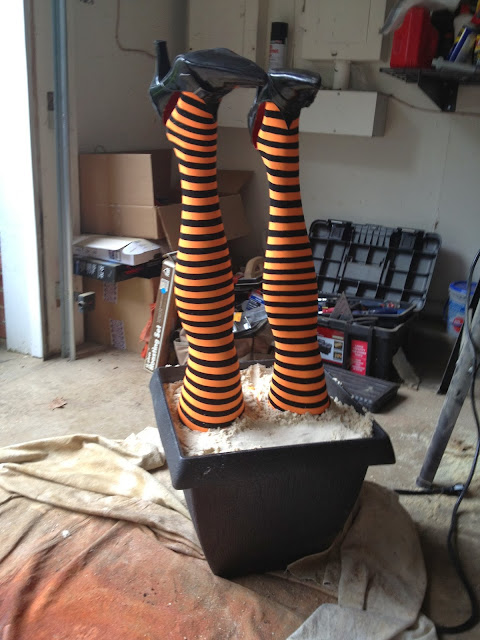
I rarely follow through with something I pin on Pinterest.  But when I saw this pin a few months ago, there was no way I wasn't going to replicate it.  Fast forward to last weekend and this beauty was sitting in our family room.


There were no directions to go along with the pin, so creativity was necessary.  After looking up "mannequin legs" on Amazon, we were in business. (Sidenote: I will never forget my husband asking me why we received "fake legs" in the mail.)

The tights were found at a party store and the shoes (size 10) at Goodwill.  I bought a plastic planter from Home Depot, spray painted it in glitter black and filled it with sandbox sand.  Anchored in the legs, covered the sand up with some deco mesh, added the broom and she was wickedly done.


The last (I think) Halloween project to share with you is the "photo booth."  I knew our house was going to be DARK at our party but also knew we did not want to miss the opportunity to photograph our friends' costume efforts.  A little niche in our house lent itself nicely to a photo booth where we could keep the lights on high.

The backdrop was fabric with some deco mesh and garland to accent it.  The sides were a flashback to my sorority rush days where we would cover our walls in twisted crepe paper.  Inexpensive and goes a long way.


You can see many of our guests' forced cameos here.  If only I had managed to subject everyone to it.

And here's a candid moment of me with Mr. Preppy Cookie. This was my consistent reaction whenever I looked at him throughout the evening. A cross between The Hulk and a Teenage Mutant Ninja Turtle who forgot to take the hairnet off of his wig.  (And don't forget the Sperry top-siders to finish off the ensemble.)


I still have no words.

TUTORIAL: Floating Candles Halloween Decor

Sometimes my husband is skeptical of my big ideas.

Does asking him to dangle candles from the ceiling seem unreasonable to you?

Yeah, me neither. :)


Though initially resistant, Mr. Preppy Cookie now agrees that the "floating candles" added the exact wow factor we needed at our spooky soiree.  Watching our guest's reactions to them made them 100% worth the effort.


(Goldendoodle photo bomb!)

To create the floating candle effect you will need:
-Battery operated candles
-Fishing line
-Scissors
-Heavy duty tacks (Yes, we put tacks in our ceiling.  We're "YOLO" like that.  Just a little spackle afterward will put everything back to normal.)

Here is the recap of what Mr. PC did from there:

-Unscrew each candle bulb
-Cut approximately 8 inches of fishing line
-Take the fishing line and tie a knot around the top of the candle
-Screw the bulb back in
-Attach other end of fishing line to the heavy duty tack
-Tack candle into the ceiling


Turn the lights off and enjoy the impact!  

TUTORIAL: Halloween Painted Wine Bottle Candles

When I posted a photo of the painted wine bottle candles I made for Halloween on Instagram, a few people asked me how to make them.  It almost seems silly to call this a "tutorial" as these are incredibly easy to create but here goes.


To make Halloween painted wine bottle candles you will need:
-Empty wine bottles
-Soap
-Spray paint 
-Craft paint
-Foam paintbrush
-Taper candles
-Foam circular stamp (optional)
-Hot glue (optional)
-Plastic spiders (optional)

First, gather your empty bottles...


and give them a long soak in a soapy warm bath to loosen up the labels.  


Remove labels and allow to dry.

(Here is where I forgot to take step-by-step photos.  It is easy enough to explain though.)

-Spray paint each bottle and allow to dry.  (I used Krylon glitter spray paint from the craft store.)
-Using the regular paint, freehand paint whatever designs you'd like. Perfection is not the key here - just have fun. I used a Martha Stewart circular foam stamp for the dots.
-Hot glue on plastic spiders or any "accessory" you'd like.
-Insert taper candles.

See?  EASY.


Great way to use your fireplace without projecting the heat that comes along with a real fire.

Enjoy!

Halloween Party 2013

Last weekend we had our first annual "Costumes & Cocktails" Halloween Party.  For years I have said that when the day came when we had enough room to host it, I'd love to have a tradition of hosting such a party. Thankfully that time came this year and we went for it.

We kept out first year on the smaller side (though 40 is still the largest group of people we have entertained.)  We spent days decorating and planning what I would say was a successful event.


Leading up to the party a friend told me she didn't want to be Bridget Jones and show up in a bunny suit as the only person in costume.  That proved to be an unnecessary concern as the spirit was definitely there among our group of friends.


A Duck Dynasty character (I won't pretend to know the name) won Best Costume while two "Non-Essential" government employees took home the Most Creative award.

Per usual most of the projects were DIY so I hope you will enjoy the recap of them this week.

Happy (almost) Halloween!