Wednesday, November 27, 2013

TUTORIAL: Heirloom Pumpkin Flower Centerpieces


A friend of mine is hosting Thanksgiving for the first time tomorrow.  She has gone ALL OUT and planned for months.  I offered to help her with the centerpieces for her big event and we had a great time making it happen last night.  Many of you have probably seen pumpkin centerpieces online but I thought I'd jot down the steps we took to make these come to life.

To make heirloom pumpkin centerpieces you will need:

-Heirloom pumpkins (hers are from Whole Foods)
-Flowers (we used 3 large hydrangea, about 8 roses and a small mixed bouquet to fill each pumpkin)
-Floral foam
-Ribbon
-Scissors

Start by soaking your floral foam in water.  While it's soaking, hollow out your pumpkins.  (We learned last night that carving heirloom pumpkins is like attending a Crossfit workout.  What doesn't kill you makes you stronger.)

Stuff each pumpkin with floral foam.


Use the hydrangea as the anchor since it's the largest flower.  Cut to your desired height and insert into the foam.  (You may need to make a hole with a pen first and then insert the stems.)

Side note: That's my mom drinking her Chardonnay and enjoying the production.  She's not as in to the "crafting scene" as I am, but she' always willing to cheer me on...and got an arm workout carving one of the pumpkins. Go mom!


Next we inserted the roses in-between the hydrangea.  (My friend's mom who is a florist taught me this trick when I helped her with the flowers at my friend's wedding a few years ago and it is now my go-to.)


Then we filled in the sides with the mixed bouquets.


Both moms nervously looking on...


No need for nerves though...it was all coming together!


Add a bow to cover any exposed floral foam....


And voila!  


I think it's safe to say my friend is going to ROCK hosting her first Thanksgiving.

I mean really...who even cares about turkey after seeing the atmosphere she created? :)


Wishing you all a very happy Thanksgiving!  Enjoy.

TUTORIAL: Turkey Cake Pops

Cake pops make me nervous. Sure, I can hold my own in the cookie department but something about cake on a stick puts me out of my comfort zone. So when a friend's son declared that he wanted to make turkey cake pops for Thanksgiving and wanted my help, I was nervous I was going to disappoint. But the nerves were for not and the process was easy thanks to the great tutorial he found and the wonder of the Nordic Cake Pop Pan. Gone are the days of mixing frosting and cake for me. This pan saved the day and the end results tasted great.

My friend made the cake balls in the pan before I arrived for assembly assistance. Here is a good tutorial on using that pan.

To make turkey cake pops you will need:
-Cake balls
-Candy melts (we used 2 bags for 28 pops)
-Ritz crackers
-Lollipop sticks
-Candy corn
-Heart sprinkles
-Candy eyes
-Scissors
-Wax paper
-Stand or tray for drying
-Colored sprinkles (optional)

We used candy melts from the craft store for our project.  I started by melting them in the microwave per the directions on the bag.  We then dipped one side of the cracker in the melted chocolate, attached the candy corn feathers and let them dry on waxed paper.

Tip: Do not overheat the candy melts.  If they seem to thick, thin them out with a little vegetable oil until they are smooth.  Allow them to cool a bit before dipping.


Dip one end of the lollipop stick into the melted chocolate and insert it into the cake ball.  Allow to dry for a few minutes.  (This will make the pops much more secure to dip.)


(Shout out to Mr. Preppy Cookie for the homemade cake pop stand!)

At this point things were going well and my helper was a happy camper.  I still had nerves with the dipping part ahead but thankfully it all had a happy ending.


We dipped the pops in the chocolate and laid them on a cracker to dry.  Then my helper went to down adding the faces and sprinkle topping.  (Be sure to cut the candy cane beaks in half.)


At first I was unsure if these would ever be able to stand up without falling apart because they were really heavy.  We had devised a plan for them to just be served on a tray on turkey day but after an hour they were able to stand tall on their own.


Closeup of my helper's hard work!


SUCCESS!


And if this reaction to our efforts doesn't make you happy, what will really???


HAPPY THANKSGIVING!

Saturday, November 9, 2013

Recipe: Butter Brickle Bars

One of my favorite things is receiving handwritten recipes, especially from family members. It's not just about the actual recipe for me but also the memory of the person through their handwriting. Over the years, my great aunt has sent me several of recipes and I have been working my way through them.


Sometimes I remember to post them here and sometimes I don't. Thankfully on round two of Great Aunt Josie's "Butter Brickle Bars" I remembered to take a (lackluster) photo.


This batch was shared with coworkers last week and several of them came in to personally thank me for them or ask me more about them. The plastic plate I brought them in on even had a "Thank you for sharing!" handwritten note taped to it once they were gone. That means someone took the time to walk back to their desk, write out the note and walk back to the kitchen to leave it there. I consider that quite the compliment and hope you all enjoy these as much as they did.

Butter Brickle Bars

Ingredients:

Cake Layer:
1 box yellow cake mix (or whatever your homemade equivalent is)
1/3 cup melted margarine
1 egg

Topping:
1 egg
1 package Heath bits
1 14 ounce can sweetened condensed milk
1 cup chopped pecans (optional - I forgot them this time and no one seemed to care!)

Instructions:

Preheat oven to 350. Mix cake mix, melted margarine and 1 egg together. Press the thick mixture into the bottom of a greased 9x13 pan. Mix together 1 egg, package of Heath bits, pecans and can of sweetened condensed milk. Drop on top of cake mixture. It spreads hard but will melt together as it bakes. Bake 30 minutes.

Saturday, October 26, 2013

TUTORIAL: Halloween Witch Legs & Photo Booth

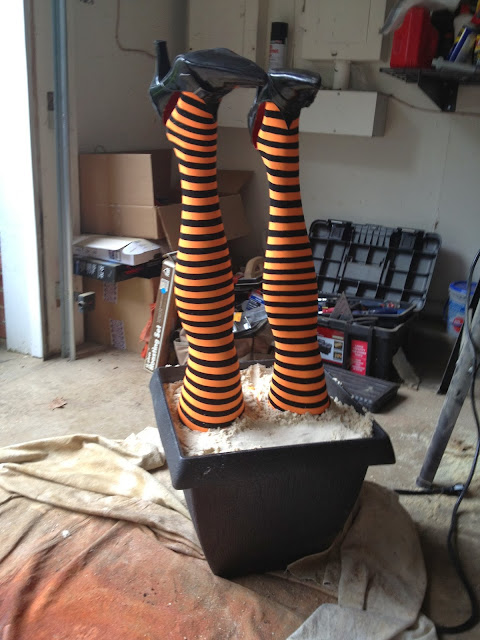
I rarely follow through with something I pin on Pinterest.  But when I saw this pin a few months ago, there was no way I wasn't going to replicate it.  Fast forward to last weekend and this beauty was sitting in our family room.


There were no directions to go along with the pin, so creativity was necessary.  After looking up "mannequin legs" on Amazon, we were in business. (Sidenote: I will never forget my husband asking me why we received "fake legs" in the mail.)

The tights were found at a party store and the shoes (size 10) at Goodwill.  I bought a plastic planter from Home Depot, spray painted it in glitter black and filled it with sandbox sand.  Anchored in the legs, covered the sand up with some deco mesh, added the broom and she was wickedly done.


The last (I think) Halloween project to share with you is the "photo booth."  I knew our house was going to be DARK at our party but also knew we did not want to miss the opportunity to photograph our friends' costume efforts.  A little niche in our house lent itself nicely to a photo booth where we could keep the lights on high.

The backdrop was fabric with some deco mesh and garland to accent it.  The sides were a flashback to my sorority rush days where we would cover our walls in twisted crepe paper.  Inexpensive and goes a long way.


You can see many of our guests' forced cameos here.  If only I had managed to subject everyone to it.

And here's a candid moment of me with Mr. Preppy Cookie. This was my consistent reaction whenever I looked at him throughout the evening. A cross between The Hulk and a Teenage Mutant Ninja Turtle who forgot to take the hairnet off of his wig.  (And don't forget the Sperry top-siders to finish off the ensemble.)


I still have no words.

TUTORIAL: Floating Candles Halloween Decor

Sometimes my husband is skeptical of my big ideas.

Does asking him to dangle candles from the ceiling seem unreasonable to you?

Yeah, me neither. :)


Though initially resistant, Mr. Preppy Cookie now agrees that the "floating candles" added the exact wow factor we needed at our spooky soiree.  Watching our guest's reactions to them made them 100% worth the effort.


(Goldendoodle photo bomb!)

To create the floating candle effect you will need:
-Battery operated candles
-Fishing line
-Scissors
-Heavy duty tacks (Yes, we put tacks in our ceiling.  We're "YOLO" like that.  Just a little spackle afterward will put everything back to normal.)

Here is the recap of what Mr. PC did from there:

-Unscrew each candle bulb
-Cut approximately 8 inches of fishing line
-Take the fishing line and tie a knot around the top of the candle
-Screw the bulb back in
-Attach other end of fishing line to the heavy duty tack
-Tack candle into the ceiling


Turn the lights off and enjoy the impact!  

TUTORIAL: Halloween Painted Wine Bottle Candles

When I posted a photo of the painted wine bottle candles I made for Halloween on Instagram, a few people asked me how to make them.  It almost seems silly to call this a "tutorial" as these are incredibly easy to create but here goes.


To make Halloween painted wine bottle candles you will need:
-Empty wine bottles
-Soap
-Spray paint 
-Craft paint
-Foam paintbrush
-Taper candles
-Foam circular stamp (optional)
-Hot glue (optional)
-Plastic spiders (optional)

First, gather your empty bottles...


and give them a long soak in a soapy warm bath to loosen up the labels.  


Remove labels and allow to dry.

(Here is where I forgot to take step-by-step photos.  It is easy enough to explain though.)

-Spray paint each bottle and allow to dry.  (I used Krylon glitter spray paint from the craft store.)
-Using the regular paint, freehand paint whatever designs you'd like. Perfection is not the key here - just have fun. I used a Martha Stewart circular foam stamp for the dots.
-Hot glue on plastic spiders or any "accessory" you'd like.
-Insert taper candles.

See?  EASY.


Great way to use your fireplace without projecting the heat that comes along with a real fire.

Enjoy!

Halloween Party 2013

Last weekend we had our first annual "Costumes & Cocktails" Halloween Party.  For years I have said that when the day came when we had enough room to host it, I'd love to have a tradition of hosting such a party. Thankfully that time came this year and we went for it.

We kept out first year on the smaller side (though 40 is still the largest group of people we have entertained.)  We spent days decorating and planning what I would say was a successful event.


Leading up to the party a friend told me she didn't want to be Bridget Jones and show up in a bunny suit as the only person in costume.  That proved to be an unnecessary concern as the spirit was definitely there among our group of friends.


A Duck Dynasty character (I won't pretend to know the name) won Best Costume while two "Non-Essential" government employees took home the Most Creative award.

Per usual most of the projects were DIY so I hope you will enjoy the recap of them this week.

Happy (almost) Halloween!

Friday, September 6, 2013

Five on Friday

(Insert obligatory "It has been a long time since I blogged" reflection here.)

Hi everyone! I just found a moment of inspiration to participate in "Five on Friday" - enjoy!


1.) About one month ago, a goldendoodle who was in need of a new home was brought to our attention. We debated over it for a week, until Mr. Preppy Cookie took Millie to meet the pup. I didn't go as I knew I would get too emotionally attached and I trusted his judgement. Next thing I knew, I received the funniest "selfie" I have seen to date and just like that we had another doodle.


Meet Penny!


2.) I am SO NOT sick of the Geico "Hump Day" commercial. This has become a joke amongst coworkers to text back and forth on Wednesdays, and it has yet to not make me laugh out loud. (Sometimes being easily entertained is good thing.)


3.) Mr. PC is building a fence in our backyard...as in doing the ENTIRE thing himself picket by picket. Do you know anyone else who has done this? It's intense.  (I am not from a handy family...this is new to us.  We tend to call in the professionals when needed.)


4.) Speaking of home transformations, here is the latest update on our kitchen upgrade. I will write separate posts on our home updates if anyone is interested. It has come a long way in the past three months and we are thrilled.


5.) HOKIE FOOTBALL SEASON IS HERE! As a school, we have made an agreement to ignore any Alabama football games, so the season REALLY starts tomorrow. ;) I cut a bouquet of my dad's orange zinnias to celebrate. Last year was the first season in FIFTEEN years that I missed a home game in Blacksburg. Here's hoping the does not repeat itself this year.


Wishing you all a fabulous weekend!

Friday, July 12, 2013

Five on Friday

For the first time I am going to participate in a blog link-up. Since I am fresh out of things to write about and have been slacking on posting cookies, this seemed like the perfect way to go!


1.) We went on vacation to the beach with friends last week. It was the first time I went to the beach for the 4th and hopefully won't be the last. It only adds to the celebration in my opinion! After ALL OF THE RAIN we have had so far this year, a few days in the sun left me feeling very grateful.


2.) As soon as we got home from the beach, I had to travel back out of town for work. Aside from a little Facetime with Mr. PC and a very confused goldendoodle, highlights of the trip included stops at two fine establishments we don't have at home...Sheetz and HOBBY LOBBY!


3.) When I came home from the second trip of the week, I was greeted by phase one of our kitchen update. We are embracing the "tuxedo" look as I now know it to be called. More updates to come over the weekend but so far so good!


4.) I have been on the hunt for a bar cart over the past few months. This past week I came across a winner on Craigs List and have already begun its transformation.


5.) Does anyone aside from me still love to collect cookbooks? I get this from my mom and between us we probably have more cookbooks than you'd care to believe. They finally have a home out of boxes thanks to our new kitchen cabinets now being able to hold the dishes that this hutch once held. Now to make the time to sit down and crack a couple of them open...


So in case you didn't already think I was among the more boring 30-somethings you "know" then this post must have only confirmed it. :) Oh well.

Wishing you all a wonderful weekend! A small sorority reunion is on the books for us and you know what that means:


Happy Friday!