Oh Minnie Mouse...hands down my favorite of the classic Disney characters. I have photos of my first meeting with her at three in Disney World and then again many years later when although of course while it was not nearly as magical, she was still my favorite.
Based on my eight and under friends' interests these days, the Disney princesses seem to be giving Miss Minnie a run for her money. (Maybe her costume change to pink will assist in getting back that fan base?!) Anyway, when a friend asked me to make Minnie-themed cookies for her daughter's birthday party recently, I was happy to hear that MM is still popular. Since I already had done a Mickey collection, I was looking forward to making some for his leading lady.
You should have seen the matching cake the birthday girl's mom made - it was impressive! I don't think I will try to tackle that until I am hosting my own Minnie Mouse party some day.
Thank you Niki!
Tuesday, January 31, 2012
Monday, January 30, 2012
TUTORIAL: How to Make a No Sew Applique Shirt
My friends certainly were inspired this weekend! I received texts proudly showing off a custom iPhone case, DIY cork and chalk boards from old frames and adorable no sew applique shirts. (So impressed ladies!) Luckily all three are OPC readers and happily accepted when I asked if they would be interested in putting together a tutorial of sorts to show us how they accomplished these gems.
First up is my good friend Krissy of "In My Life." Even with twin toddler boys and a full schedule to manage, Krissy always is texting me photos of creations she has made and/or baked. We have gone back and forth with recipes and projects for years - it would be dangerous if we lived in the same city!
I will let her do the talking and show us how to make these CUTE shirts. Thank you so much Krissy for taking the time to write this us!
This is nothing new and certainly you can find fancier versions on many other websites and blogs. But the fact that I was able to make it at all (and cheap too!) is what excites me AND that my boys will be sporting their shirts made by yours truly is even better.
I've had in my head that I'd find some cute birthday shirts for the boys to wear on their upcoming special day, so I started searching Etsy and talking to a friend who makes her own personalized items. Then a couple weeks ago I attended a baby shower and the creative hosts had a 'bib and onesie decorating station.' Super clever, user friendly, personal, and cute! And it hit me...once I'd made an outfit for the guest of honor: bun in the oven, I realized this is what I'd been looking for. Thanks to Erin (who happens to do some fabulous design work, which can be seen here) I went home with some spare prepped fabric scraps and her specific instructions (below). That night I dug out some plain shirts in the boys' drawers and got to work. Ten minutes later mission accomplished: superstar two year old birthday shirts!!! Thank you, Amy, for the decorative stitching (optional).
Supplies:
Fabric - Hancock Fabric sells "Design by the Piece" singles for $1.99 each. They're cotton and measure 18" by 21".
Iron-on Adhesive - I bought "Heat and Bond" for $2.99/yard. After reading some more though, I've heard "Stitch Witchery" and "Wonder Under" may be even better for someone planning to go around the applique with a sewing machine.
Template/Stencil
Bib/Onesie/T-shirt
Scissors
Iron
Cardboard
Directions:
-Wash and dry all the fabric and bib/onesie/t-shirt so nothing shrinks up after applying the appliques.
-Cut the Heat and Bond just smaller than the fabric sheets and iron the "glue" side down onto the wrong side of the fabric, leaving the paper up
-Trace shape on the backside of the fabric...a pen will move more smoothly over the Heat and Bond. Remember that if you're doing a letter to trace it backwards because when you flip it over to iron on you'll want it facing the right direction!
-Cut out shape.
-Remove the paper backing and place shape 'tacky' side down onto fabric.
-Place cardboard piece inside the onesie/t-shirt or underneath the bib.
-Iron (cotton setting) shape onto bib/onesie/t-shirt.
The possibilities are endless...children's gifts here I come!
Friday, January 27, 2012
Bachelorette Par-tay!
Yesterday my new cousin Sarah sent me an email about how to "calculate the number of Kardashians you've been married." (You can try it here.) Lucky for me I've been married 22.65! Anyway it made me think that I never shared the treats that I made for her Bachelorette Party back in September. As you know Sarah is a big fan of this endeavor so I certainly wasn't willing to go to her big weekend empty-handed.
I chose to bake my sugar cookies but change things up with the icing. Instead of my royal icing designs, I decided to pipe buttercream roses on top of each cookie. I loved the look and think it would be pretty for any shower/party.
The real winner of the weekend though? The chocolate chip cookie dough cupcakes I brought. We ate these for dessert and again with our coffee for breakfast. People were still asking me about them at the wedding two months later. Loved that!
For me it goes back to my thoughts on making it personal when celebrating special events. I knew my sweets-loving future cousin would enjoy these things so it was more than worth the effort invested in making them.
Happy Friday everyone! Wishing you all a very happy weekend.
I chose to bake my sugar cookies but change things up with the icing. Instead of my royal icing designs, I decided to pipe buttercream roses on top of each cookie. I loved the look and think it would be pretty for any shower/party.
The real winner of the weekend though? The chocolate chip cookie dough cupcakes I brought. We ate these for dessert and again with our coffee for breakfast. People were still asking me about them at the wedding two months later. Loved that!
For me it goes back to my thoughts on making it personal when celebrating special events. I knew my sweets-loving future cousin would enjoy these things so it was more than worth the effort invested in making them.
Happy Friday everyone! Wishing you all a very happy weekend.
Thursday, January 26, 2012
Little Ladybug
Ladybugs are the only "bug" I can think of that I actually welcome when I see. They are considered lucky after all! I love all of the children's clothing and party decor inspired by these pretty bugs so I happily accepted when a friend asked me to make ladybug cookie favors for her daughter's first birthday party. (I feel the same way about bumble bee decor, but certainly cannot say the same nice words about an in-person encounter!) I decided to work in a few designs and stick to the traditional colors.
Thank you very much Erin - I hope your little ladybug loved these!
Tuesday, January 24, 2012
Chocolate Chip Oatmeal Coconut Cookies
Last Friday night I had my good friend over for dinner. She made her famous margaritas and I made a recipe we had both been admiring. I had almost convinced myself that we did not need a dessert but of course made one at the last minute. I have made this recipe as cookies several times but this time baked them in an individual bar pan so we could each have our own treat and I would not have to go back and forth to the oven. Thankfully she loved this recipe as much as I already did so I thought I would share it with you. (Maybe some day I will share her margarita recipe too!)
Chocolate Chip Oatmeal Coconut Cookies
Yields: 18 cookies
Ingredients:
2 cups all-purpose flour
1 teaspoon baking soda
1 cup unsalted butter, room temperature
1 cup sugar
1/2 cup firmly packed light brown sugar
1 teaspoon salt
2 large eggs
1 1/2 tablespoons pure vanilla extract
12 ounces semisweet chocolate chips
1 cup sweetened shredded coconut
1 cup old fashioned rolled oats (not instant)
Directions:
Preheat the oven to 350 degrees.
In the bowl of a standing mixer fitted with a paddle attachment, beat the butter, granulated sugar and salt on medium-high speed until light and fluffy, 2 to 3 minutes, scraping down the sides of the bowl halfway through. Add the eggs one at a time, beating after each addition. Beat in the vanilla.
With the mixer on low speed, add the dry ingredients, beating until the flour is absorbed. Gently mix in the coconut,then oats and finally chocolate chips.
If making cookies, roll the dough into generous sized balls (about 2 inches) and place onto greased baking sheet about 2-3 inches apart.
Bake one sheet at a time, rotating the sheet about two-thirds of the way through the baking time, until the cookies are set and browned on the edges but still very soft in the center, 15 to 18 minutes. (Same timing worked for the individual bar pan.) Transfer the baking sheet to a wire rack to cool for 10 minutes. Use a spatula to transfer the cookies to the rack and let cool completely
Source: The SoNo Baking Company Cookbook via A Chica Bakes
Sunday, January 22, 2012
A Sad Day in Happy Valley
I first went to Penn State in the fall of 2004. My boyfriend at the time (now husband) was so proud to take me to his school and I must say that I was instantly enamored. The focus of our weekend was my first football game in Beaver Stadium. I remember being excited to see JoePa - a true coaching legend - in person and proudly reporting back to my dad once I had.
Since then, I have been to more Penn State games than I can count, both in Happy Valley and across the country really. Some of my happiest memories with friends in my post-college years have been tailgating outside Beaver Stadium and enjoying all that PSU has to offer. I have made life-long wonderful Nittany Lion friends and over seven years later, I personally feel a big sense of loyalty toward and pride for the PSU community.
This post is about celebrating a life and not debating the issues. I don’t expect everyone to understand a Penn Stater’s love for Joe Paterno. I know I can speak on their behalf and say that it is about much more than just football.
No one has been more prideful of and giving to Penn State than JoePa. As one friend put it, "He is the honorary grandfather of every Penn Stater" and will truly be missed. I hope his family is able to find peace with their loss.
And to end on a lighter note…check out Joe in his embroidered whale pants circa 1982. Perhaps he was a bit of a preppy cookie himself?!
“Believe deep down in your heart that you’re destined to do great things.” –Joe Paterno
Friday, January 20, 2012
Girly Thirty
Turning the big 3-0 is a birthday many people struggle with. I remember when I turned 30 (thankfully it was not THAT long ago!) On one hand it was a strange feeling to no longer be in my twenties. I had conflicted feelings about that. On the other hand though, I didn't really mind. I was comfortable with who I was, had accomplished many things and of course had a lot to look forward to. Thirty one? For some reason that was a little bit harder for me. ;) (I know I will be laughing at myself down that road when I am celebrating more significant birthdays but I hope I still have that same feeling of contentment.)
I love that the cookie requests I have been receiving for birthday are always focused on the recipient's favorite things. (Not many "Over the Hill" and cane requests!) This collection is no different. A friend asked me to make cookies to celebrate her friend's 30th, focusing on a few girly items like Tory Burch shoes, makeup, cupcakes, shoes and martinis. (Is she sure these weren't for me??)
"Favorite things" are one of my favorite things to do in cookies - I love to hear of people's reactions over them. Hopefully the birthday girl liked these as much as I did.
Thank you once again Esther!
Thursday, January 19, 2012
Under the Sea
I cannot even type the above title without flashing back to watching "The Little Mermaid" on VHS repetitively. (Even though I was dangerously close to being in junior high at that point and probably a bit too old to enjoy it as much as I did, I couldn't help but love it.) And while these cookies had nothing to do with the movie, the theme song played repetitively in my head as I made them.
These "under the sea" cookies were made to match the invitations for a friend's son's second birthday party. They featured fish and seahorses...the whales just happen to be a favorite of the birthday boy. (Good addition to the collection on his part!)
I was particularly partial to the seahorses.
Thank you very much Janelle - I hope you all had a great celebration!
Tuesday, January 17, 2012
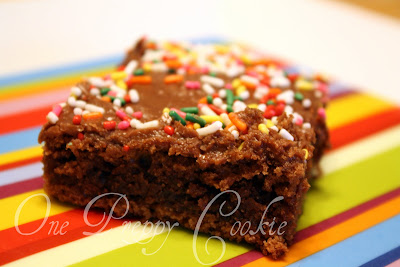
Recipe: Brownie Sheet Cake
Growing up we would celebrate Thanksgiving and Easter with my family at my Great Aunt & Uncle's home. They would prepare feasts that I will always remember fondly. (In fact I referenced our holidays together in my first blog post as I was proudly the designated "place card maker" for them.) After those meals we would indulge in my Great Aunt's confections which were always delicious. This past summer we all got together for a family reunion of sorts and the morning we left I went through "Auntie's" recipes, rapidly writing down as many as I could. It was another fun morning with family that I will never forget.
So last weekend when I offered to bring dessert to a friend's house, I decided to try one of my prized recipes from Auntie. I only made a couple of small changes based on what I had and the end result was delicious. I would feel confident taking this cake anywhere and that the guests would love it. "Delicious" is a good word for this cake!
Brownie Sheet Cake
Ingredients:
For the cake:
-1 cup salted butter
-1 cup water
-1/4 cup cocoa powder (I tend to have sweetened in my pantry but unsweetened works too)
-2 cups flour
-2 cups sugar
-1 teaspoon baking soda
-1 teaspoon cinnamon (omit if you don't care for cinnamon - I rarely add this)
-1 teaspoon vanilla extract
-2 eggs
-1/2 cup buttermilk
For the frosting:
-1/3 cup buttermilk
-1/2 cup salted butter
-1 box confectioner's sugar (1 pound)
-1/4 cup cocoa powder
-1 teaspoon vanilla extract
Directions:
For the cake: Preheat oven to 350. Place the butter, water and cocoa powder into a saucepan over medium heat. Bring to a boil, then set aside. Combine the flour, sugar, baking soda and cinnamon (if using) to a mixing bowl. Add mixture from sauce pan and whisk together. Add eggs one at a time until combined, then add buttermilk and vanilla. Mix until combined. Pour into greased jelly roll pan (or cookie sheet with raised sides) and bake for 20 minutes.
For the frosting: While the cake is baking, make the frosting. Heat buttermilk and butter over medium heat until boiling. Turn down heat to low. Stir in vanilla. Add confectioner's sugar and stir until combined. Add cocoa, stirring until combined. Remove from heat.
Frost the cake while it is still hot by pouring the frosting over it evenly. Lightly push it to the edges with a spatula. Garnish with sprinkles or powdered sugar if desired.
Enjoy!
Monday, January 16, 2012
TUTORIAL: How to Make a Paper Heart Wreath
Confession: We just took our Christmas tree down over the weekend. And it was a live one that had been up since the day after Thanksgiving. Needless to say it was looking a little "Charlie Brown" but we just hadn't made the time to do it. That being said, I also put up a few Valentine's Day decorations over the weekend. (Nothing like a quick transition!) I don't do too much decorating for that holiday, although it is a favorite of mine. Most of what I do are little decorations I have made so I thought I would share a few of them with you, starting with a VERY easy paper heart wreath. This is a craft that can easily be done with or by children, is inexpensive and hardly what I would consider time consuming. Need something to do with the kids while your husband is glued to the TV watching NFL playoffs?? This might be it. :)
To make a paper heart wreath you will need:
-Colored paper of your choice (I used 2 designs)
-Scissors
-Glue (I used hot glue)
-Ribbon
First cut about 12 one inch wide strips of paper. You could use a paper cutter if you have one, a ruler, or do what I did and eye-ball it. (Remember this is a paper wreath we're talking about...perfection is not required.) Then fold all of the strips in half with the side of paper you want showing facing out.
Attach a dab of glue to one outside end of the paper.
Then fold the paper into a heart shape with the 2 outside ends meeting in the center. Hold the ends together for a minute so the glue will stick.
Repeat this process with all of your paper strips.
Next glue the hearts together by adding a dab of glue to the side of each heart (just under the heart's outside curve.) Again hold the hearts together for a moment to allow the glue to set. Continue this process until a circle has formed with your hearts.
Tie a ribbon to your wreath wherever you would like it to hang from. (I used 2 ribbons and then tied them in a know at the top.)
Voila!
See? Easy!
Have a great week everyone!
Thursday, January 12, 2012
Punk 1st Birthday Party Cookies
Last month I made first birthday cookies for one of the trendiest little boys I know. Being the first baby in this particular circle of friends, he set the bar high for hipster fashion with his signature flannel shirt/rock tee, not to mention his adorable grins. My friend, his mom, has a penchant for party planning, pulling out all the stops to make G's punk birthday party one to remember.
I was told to think "baby mohawks" and that from there "I knew the drill" so I went with it for the cookie favors.
I was thankful for that trust and happy to hear that they were well-received.
Thanks A - you did it! Year one is done and your G is a happy little guy.
I was told to think "baby mohawks" and that from there "I knew the drill" so I went with it for the cookie favors.
I was thankful for that trust and happy to hear that they were well-received.
Thanks A - you did it! Year one is done and your G is a happy little guy.
Wednesday, January 11, 2012
Storybook Cookies Take Two
As mentioned in my 2011 recap, my first round of storybook characters proved to be a favorite. So when a friend asked me to make some for another storybook-themed baby shower I was happy to give it another go! The requests had two new characters on the list - Paddington Bear and Winnie the Pooh (the original version) while "The Cat in the Hat" and "The Very Hungry Caterpillar" remained consistent favorites.
I received a note from the hostess saying that these were a "major hit" and couldn't have been more excited about that.
Thank you Missy!
I received a note from the hostess saying that these were a "major hit" and couldn't have been more excited about that.
Thank you Missy!
Tuesday, January 10, 2012
Making it Personal
Do you know what I love most about attending parties and showers? No, it's not seeing who had the nicest venue and it's not whose food was the fanciest either. It's not who has the most activities nor who went all out on decor. For me my favorite part of parties is seeing the personal touches. The little things that the host(ess) did to make the event personal and show that they care. Not everyone is creative and not everyone is the best cook. But everyone throws a party or shower because they care about the recipient and/or guests. We may express that thought in different ways and I always love to see it.
I do happen to be creative and I do love to bake. So I decided to combine those two things over the weekend while I participated in celebrating a friends' baby. I took a simple white box, trimmed it in ribbon using spray glue and attached a flower sticker over the seam (the mom-to-be LOVES fresh flowers.) I then baked and frosted cupcakes (another love of hers) that served as both our dessert and favor. It was my way of making it personal.
Don't love the baking part? Then you could fill the box with store-bought cupcakes. It's the thought that counts. :)
Congratulations Nicole! I cannot wait to meet baby L very soon.
Monday, January 9, 2012
Bumble Bee Birthday
Throughout our wedding planning it became clear that we all wanted the opportunity to enjoy our day instead of worrying about what was supposed to happen when. At the last minute my mom and I decided that we needed a planner to help us execute the event. Enter our lifesaver, Lacey. She was the exact person we needed to ease our minds and did a wonderful job that we were very thankful for.
These days Lacey is quite the busy bee, adding a beautiful daughter to her meticulous day planner. I was excited when she contacted me to make bumble bee cookies for little R's first birthday party and loved the way they turned out.
Thank you Lacey - congratulations on making it through year one!
These days Lacey is quite the busy bee, adding a beautiful daughter to her meticulous day planner. I was excited when she contacted me to make bumble bee cookies for little R's first birthday party and loved the way they turned out.
Thank you Lacey - congratulations on making it through year one!
Friday, January 6, 2012
Life in the Big Easy
We are BACK after a few days in "The Big Easy." It was our first trip to New Orleans and hopefully not our last! We had a packed few days and don't feel like we missed a thing. Here's a brief recap of our whirlwind tour...
Of course we had to sample the local fare, with hurricanes and biegnets to name a few.
We loved soaking up the culture the city had to offer and I was impressed by all of the creativity shown.
We ate at a few great restaurants.
And were able to visit a very special place where my cookies had been in the past.
We threw beads off of a Bourbon Street balcony.
And while we were certainly not their good luck charm, we cheered on my beloved Hokies.
It was a wonderful way to start the new year. Within hours of stepping off of the plane I was back to baking. Sometimes all you need is a little time off to rejuvenate! I have SO much to show you over the next few months.
Thank you for your kind comments last week - hope your 2012 is starting out right!
Subscribe to:
Posts (Atom)